
Linux Programmer
GNOME 3 터치패드 추가 제스처 설정 (touchegg) - 2편 본문
touchegg는 애플리케이션별로 three, four finger swipe나 pinch in/out(꼬집는 것처럼 오므리거나 반대로 펴는 행동), tapping을 설정할 수 있어서 매우 편리한 유틸리티이다. 특히 같은 제스처도 애플리케이션별로 다르게 지정할 수 있으므로 매우 편리하다.
여기서는 주로 세손가락 제스처를 사용할 것이므로 GNOME3 기본 제스처랑 충돌이 날 수 있다. 따라서 앞서 작성한 1편의 내용인 GNOME3 swipeTracker.js 설정하고 와야만 한다. 물론 반대로 GNOME3 기본 제스처인 세손가락을 쓰지 않고 모두 4손가락을 touchegg에서 사용한다면 1편의 설정을 무시해도 된다. 다만 아래 touchegg.conf 설정에서 3손가락 설정을 모두 4손가락으로 변경해야만 할 것이다.
GNOME3 터치패드 4손가락 설정 방법 - 1편
1. touchegg 및 프론트엔드 설치
touchegg는 디먼(daemon)으로 작동하는 프로그램으로 설치는 간단하게 dnf, yum으로 패키지 설치가 가능하다. 다만 설정 파일을 생성할 때 vim 에디터로 설정하는데, 이게 귀찮기 때문에 GUI 프론트엔드인 Touché를 설치해서 사용하는 편이다. 물론 GUI 설정 툴 없이 vim으로 해도 문제는 없다. 다만 여기서는 GUI 프론트엔드까지 설치하는 것을 기준으로 한다.
1.1. touchegg 디먼 서비스 설치
아래와 같이 dnf 명령어로 설치하고, systemctl 명령어로 활성화 및 실행을 하였다. 테스트 리눅스 배포판은 Fedora 37이었다.
# dnf -y install touchegg

# systemctl enable --now !$

# systemctl status !$
● touchegg.service - Touchégg Daemon
     Loaded: loaded (/usr/lib/systemd/system/touchegg.service; enabled; preset: disabled)
    Drop-In: /usr/lib/systemd/system/service.d
             └─10-timeout-abort.conf
     Active: active (running) since Sat 2023-08-05 13:30:45 KST; 21min ago
       Docs: https://github.com/JoseExposito/touchegg/tree/master/installation#readme
   Main PID: 1090 (touchegg)
      Tasks: 5 (limit: 18592)
     Memory: 25.5M
        CPU: 121ms
     CGroup: /system.slice/touchegg.service
             └─1090 /usr/bin/touchegg --daemon
1.2. Touché 프론트엔드 설치
Touché URL 주소 = https://flathub.org/apps/details/com.github.joseexposito.touche
Touché는 flatpak 기반이며 관련 URL 주소는 다음과 같다. flatpak 설치 방법이 익숙치 않다면 그냥 아래 명령어를 따라하기로 진행하면 된다.
# flatpak remote-add --if-not-exists flathub https://flathub.org/repo/flathub.flatpakrepo

# flatpak search touchegg
Name      Description            Application ID                  Version  Branch    Remotes
Touché    Multi-touch Gestures   com.github.joseexposito.touche  2.0.8    stable    flathub

# flatpak install flathub com.github.joseexposito.touche
2. touchegg 설정
touchegg의 설정 파일 위치는 아래와 같다. vim으로 파일을 생성해도 된다. (혹은 프론트엔드인 Touché를 사용해도 되지만 프론트 엔드의 사용은 조금 뒤에서 살펴보도록 하겠다) 일반은 vim이나 에디터로 아래 경로에 touchegg.conf를 생성할 것이다.
~/.config/touchegg/touchegg.conf
2.1. touchegg.conf 편집
아래와 같은 제스처 기능을 설정하려면 touchegg.conf 파일에 아래 코드의 내용을 넣으면 된다. 각각 chromium-browser와 google-chrome을 보여주고 있다.
| chromium-browser의 <gesture> 설정 | 키 조합 | 설명 |
| type="PINCH" fingers="2" direction="IN" | Control_L + KP_Subtract | 축소 |
| type="PINCH" fingers="2" direction="OUT" | Control_L + KP_Add | 확대 |
| type="SWIPE" fingers="3" direction="LEFT" | Control_L + Page_Up | 왼쪽 탭 |
| type="SWIPE" fingers="3" direction="RIGHT" | Control_L + Page_Down | 오른쪽 탭 |
| google-chrome의 <gesture> 설정 | 키 조합 | 설명 |
| type="PINCH" fingers="2" direction="IN" | Control_L + KP_Subtract | 축소 |
| type="PINCH" fingers="2" direction="OUT" | Control_L + KP_Add | 확대 |
| type="SWIPE" fingers="3" direction="UP" | Shift_L + 6 | vimium 사용시 previous tab |
| type="SWIPE" fingers="3" direction="DOWN" | Control_L + F4 | 현재 탭 닫기 |
| type="SWIPE" fingers="3" direction="LEFT" | Control_L + Page_Up | 왼쪽 탭 |
| type="SWIPE" fingers="3" direction="RIGHT" | Control_L + Page_Down | 오른쪽 탭 |
사실 크로미움 브라우저는 쓰지 않는 경우도 많으므로 <application name="chromium-browser"> ... </application>은 삭제해도 된다.
<touchégg>
  <settings>
    <property name="animation_delay">150</property>
    <property name="action_execute_threshold">20</property>
    <property name="color">auto</property>
    <property name="borderColor">auto</property>
  </settings>
  <application name="All">
  </application>
  <application name="chromium-browser">
    <gesture type="PINCH" fingers="2" direction="IN">
      <action type="SEND_KEYS">
        <repeat>true</repeat>
        <modifiers>Control_L</modifiers>
        <keys>KP_Subtract</keys>
        <decreaseKeys>KP_Add</decreaseKeys>
      </action>
    </gesture>
    <gesture type="PINCH" fingers="2" direction="OUT">
      <action type="SEND_KEYS">
        <repeat>true</repeat>
        <modifiers>Control_L</modifiers>
        <keys>KP_Add</keys>
        <decreaseKeys>KP_Subtract</decreaseKeys>
      </action>
    </gesture>
    <gesture type="SWIPE" fingers="3" direction="LEFT">
      <action type="SEND_KEYS">
        <modifiers>Alt_L</modifiers>
        <keys>Left</keys>
        <repeat>false</repeat>
        <animation>NONE</animation>
        <on>end</on>
      </action>
    </gesture>
    <gesture type="SWIPE" fingers="3" direction="RIGHT">
      <action type="SEND_KEYS">
        <modifiers>Alt_L</modifiers>
        <keys>Right</keys>
        <repeat>false</repeat>
        <animation>NONE</animation>
        <on>end</on>
      </action>
    </gesture>
  </application>
  <application name="google-chrome">
    <gesture type="PINCH" fingers="2" direction="IN">
      <action type="SEND_KEYS">
        <repeat>true</repeat>
        <modifiers>Control_L</modifiers>
        <keys>KP_Subtract</keys>
        <decreaseKeys>KP_Add</decreaseKeys>
      </action>
    </gesture>
    <gesture type="PINCH" fingers="2" direction="OUT">
      <action type="SEND_KEYS">
        <repeat>true</repeat>
        <modifiers>Control_L</modifiers>
        <keys>KP_Add</keys>
        <decreaseKeys>KP_Subtract</decreaseKeys>
      </action>
    </gesture>
    <gesture type="SWIPE" fingers="3" direction="UP">
      <action type="SEND_KEYS">
        <modifiers>Shift_L</modifiers>
        <keys>6</keys>
        <repeat>false</repeat>
        <animation>NONE</animation>
        <on>end</on>
      </action>
    </gesture>
    <gesture type="SWIPE" fingers="3" direction="DOWN">
      <action type="SEND_KEYS">
        <modifiers>Control_L</modifiers>
        <keys>F4</keys>
        <repeat>false</repeat>
        <animation>NONE</animation>
        <on>end</on>
      </action>
    </gesture>


    <gesture type="SWIPE" fingers="3" direction="LEFT">
      <action type="SEND_KEYS">
        <modifiers>Control_L</modifiers>
        <keys>Page_Up</keys>
        <repeat>false</repeat>
        <animation>NONE</animation>
        <on>end</on>
      </action>
    </gesture>
    <gesture type="SWIPE" fingers="3" direction="RIGHT">
      <action type="SEND_KEYS">
        <modifiers>Control_L</modifiers>
        <keys>Page_Down</keys>
        <repeat>false</repeat>
        <animation>NONE</animation>
        <on>end</on>
      </action>
    </gesture>
  </application>
</touchégg>
위 touchegg.conf 파일의 일부를 떼어서 설명을 해보면 다음과 같다. <action>, <repeat>, <modifiers>, <keys>, <on> 부분을 특히 주목해서 살펴보자.
<application name="google-chrome"> 제스처를 적용할 프로그램 이름(실행파일명과 다를 수 있음)
  <gesture type="PINCH" fingers="2" direction="IN"> 2개의 손가락을 꼬집는 제스처 (OUT은 반대방향)
    <action type="SEND_KEYS"> 해당 제스처가 발생하면 키를 누르는 액션으로 대체
      <repeat>true</repeat>   해당 액션을 연속적으로 발생시킬 것인지 설정
      <modifiers>Control_L</modifiers> ALT나 CONTROL키와 조합 (Control_L = 왼쪽 컨트롤키)
      <keys>KP_Subtract</keys>      함께 눌러지는 키를 의미(KP_Subtract=키패드 마이너스)
      <decreaseKeys>KP_Add</decreaseKeys> 반대 작동을 하는 키(설정)
    </action>
  </gesture>

  <gesture type="SWIPE" fingers="3" direction="LEFT"> 3개의 손가락을 왼쪽으로 스와이프
    <action type="SEND_KEYS">
      <modifiers>Control_L</modifiers> CONTROL(왼쪽)키와 조합
      <keys>Page_Up</keys>
      <repeat>false</repeat> 반복하지 않음
      <animation>NONE</animation> 애니메이션 없음
      <on>end</on> 스와이프를 끝내고 손가락을 뗄 때 작동, (begin)으로 하면 스와이프하자마자 작동
    </action>
  </gesture>
제스처 설정 중에 <on>end<on>이 일반적으로 사용되어 손가락을 뗄때 반응하지만, 빠르고 민감하게 반응하도록 하려면 <on>begin</on>을 사용한다. 하지만 이렇게 하면 잘못 스와프된 경우에도 빠르게 반응하는 단점이 있다. 사람 나름이므로 설정을 조금씩 변경해가면서 본인이 편한 것을 사용하자.
touchegg.conf 설정파일은 수정하는 즉시 반영되므로 따로 리로드 해줄 필요는 없다. 하지만 간혹 리로드가 제대로 안되거나, 설정이 잘못되어 touchegg가 크래시가 날 수도 있다. 이런 경우에는 X window를 로그아웃 했다가 다시 로그인하면 된다. 혹은 touchegg 클라이언트 프로세스를 재시작해줘도 되는데, touchegg의 이름을 가진 프로세스 목록중에 PPID가 1번인 프로세스(daemon)를 제외하고 떠 있는 프로세스를 찾아서 재시작 or 죽인 뒤 실행해줘도 된다. (크래시라면 목록에 touchegg 클라이언트가 없을 수도 있다) 하지만 프로세스 재시작 방법에 대해 잘 모른다면 그냥 로그아웃 했다가 다시 로그인하자.
2.2. touchegg.conf에 히스토리 기능 넣기
위에서는 touchegg.conf의 세손가락 좌, 우 스와이프를 탭 이동으로 해두었다. 본인은 탭 이동을 많이 하는 편이라 이렇게 해두었는데 사람에 따라서는 히스토리 기능으로 수정하고 싶을 수도 있다. 그런 경우에는 아래와 같이 수정하면 된다. 수정 후에는 자동으로 설정 파일이 리로드 되므로 즉시 바뀐 것을 볼 수 있다.
<touchégg>
…생략…
<gesture type="SWIPE" fingers="3" direction="LEFT">
<action type="SEND_KEYS">
<modifiers>Alt_L</modifiers>
<keys>Left</keys>
<repeat>false</repeat>
<animation>NONE</animation>
<on>end</on>
</action>
</gesture>
<gesture type="SWIPE" fingers="3" direction="RIGHT">
<action type="SEND_KEYS">
<modifiers>Alt_L</modifiers>
<keys>Right</keys>
<repeat>false</repeat>
<animation>NONE</animation>
<on>end</on>
</action>
</gesture>
</application>
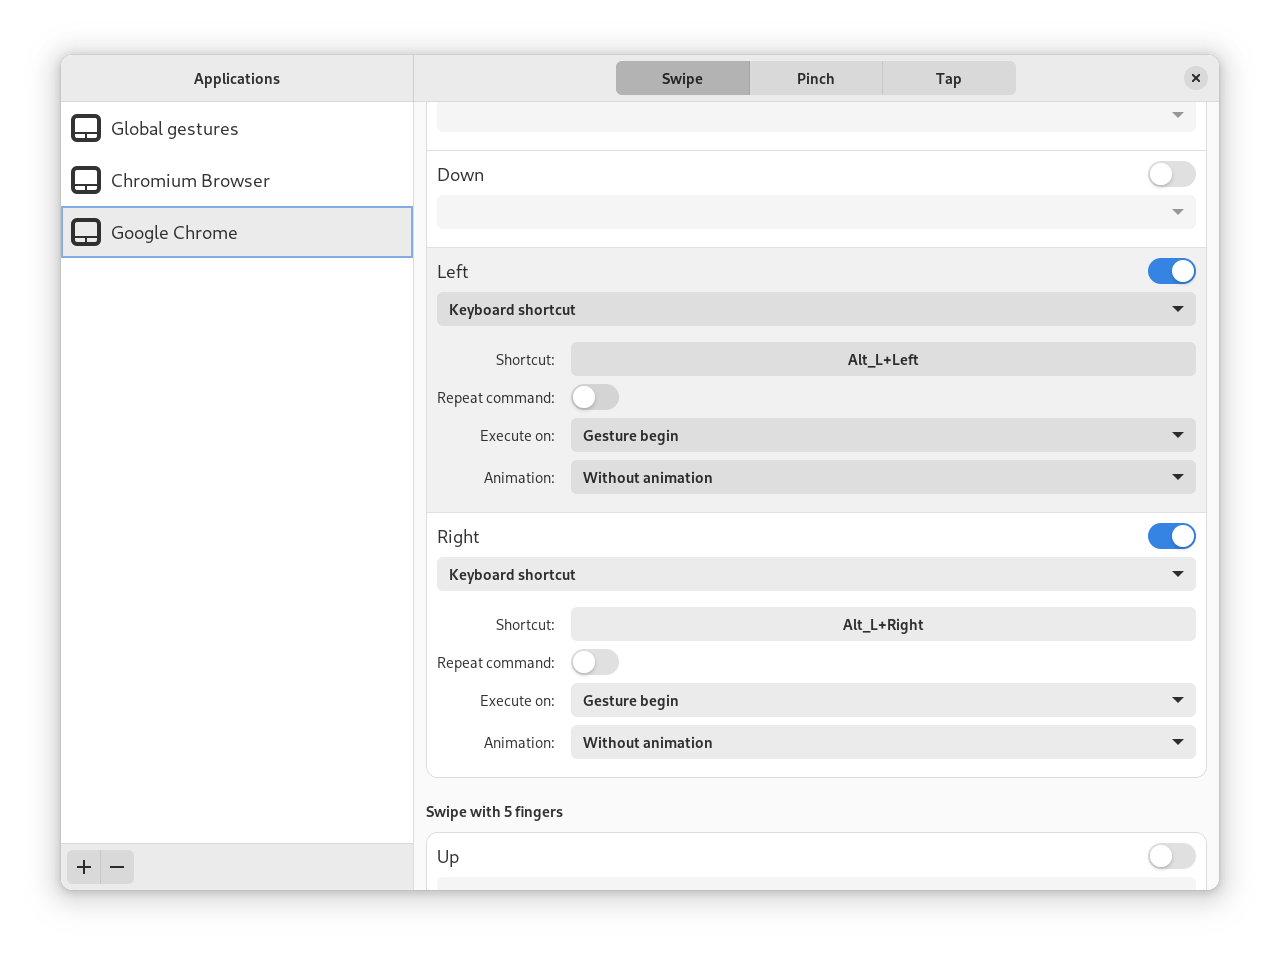
</touchégg>위의 경우 왼쪽 스와이프시에는 Alt_L+Left 방향키를 누른 것과 같고, 오른쪽 스와이프는 Alt_L+Right 방향키를 누를 것과 같이 작동한다.
3. Touché 프론트엔드 사용법
앞서 flatpak 기반의 Touché 프론트엔드 GUI 툴을 설치했다면 이를 이용해서 쉽게 설정할 수도 있다.
실행 방법은 Super키를 눌러서 앱 검색 창에서 touch 정도만 치면 애플리케이션이 목록에 Touché가 보일것이다. 이를 실행하면 다음과 같은 설정을 볼 수 있다. 텍스트 설정 파일에 익숙하지 않다면 Touché 설정 툴을 쓰는 것도 좋다. 혹은 기본 설정말 Touché 를 써서 생성하고 나머지 세세한 설정은 vim 에디터로 열어서 편집해도 된다.
4. touchegg가 문제를 일으킨 경우
간혹 로그인시 터치에그가 죽었다는 메시지를 볼 수도 있다. 이는 클라이언트 모드로 작동할 때 간혹 생기는 문제인데, 그냥 재실행해주면 된다. 터미널을 열어서 touchegg를 타이핑후 실행해도 되지만, 이런 경우에는 해당 터미널을 계속 열어둬야 하므로 귀찮을 수 있다. 따라서 GNOME에서 실행하는 기능을 사용하면 편리하다. 실행 방법은 ALT-F2를 누르면 GNOME 명령어 실행 프롬프트창이 뜨는데, 거기에 touchegg 라고 쳐주면 된다.
* History
2023-08-09 초고
'컴퓨터 관련 > 리눅스 데스크탑' 카테고리의 다른 글
| 터치패드 켜기/끄기 토글 기능 - Fedora Linux (2) | 2024.01.08 |
|---|---|
| 리눅스에서 커스텀 키보드 펑션키 F11, F12등의 이상 작동 문제 (0) | 2023.10.31 |
| GNOME 3 터치패드 4손가락 설정 방법 - 1편 (0) | 2023.08.07 |
| GNOME3 화면 스케일 125% 150% 175% 조정 (0) | 2023.03.27 |
| intel 13th gen (i5-1340p)의 리눅스 화면 끊김, 멈춤 증상 (2) | 2023.02.15 |
| Fedora : 구글 크롬 재설정 및 열려있는 탭(tabs) 목록 복원 (0) | 2022.07.25 |
| Fedora 35 에서 youtube 재생 오류 (0) | 2022.05.03 |
| 리눅스 한글 입력기 nimf : Fedora33 (2) | 2021.01.04 |


