
- 0x0000007b
- 2차세계대전
- 3.20해킹
- 3d프린터
- 4대강
- 502 error
- 53빌딩
- 7640HS
- 7840hs
- 88체육관 수영장
- ABI
- abortive close
- abortive shutdown
- AHCI
- aic8800d80 chipset
- akmods
- ALC1220
- algif_aead
- algif_aead_init
- alma linux
- alternatives
- AM4 메인보드
- AMD
- AMD 7640HS 35W power limit
- amd 7840hs
- AMD Ryzen H255
- amd 그래픽 게임용
- amd 내장 그래픽 최적화
- anonymous file
- apple.com
- Today / Yesterday
- /
- Total
Linux Programmer
리눅스 절전(suspend) 끄기 및 비활성화 systemd sleep 설정 본문
리눅스 워크스테이션이나 데스크탑 버전을 설치하면 절전 기능이 활성화 되어있다. 예를 들어 Fedora workstation을 설치했다면 기본으로 절전이 활성화되어 사용하지 않으면 일정 시간 후 절전 상태로 전환된다. 만일 ssh로 외부에서 접속해서 작업하다보면 아래와 같은 메시지와 함께 절전으로 전환(suspend) 될 수도 있다. 이렇게 절전 모드로 빠지면 외부 접속은 모두 끊기게 된다.
$ Broadcast message from gdm@fedora on tty1:

The system will suspend now!
이런 문제를 겪지 않으려면 다음과 같이 설정하도록 한다. (관련 매뉴얼 페이지 : systemd-sleep.conf)
주의할 점은 이 방법은 랩탑(노트북)에서 설정하면 덮개를 닫아도 계속 작동되므로 발열이 올라가거나 급격하게 배터리를 소모할 수 있으므로 랩탑인 경우는 이 방법이 아니라 다른 방법을 사용해야 한다. 따라서 여기서는 우선 항상 켜놓는 PC workstation 기준의 설명을 하고, 그 다음에는 랩탑(노트북)에서 설정하는 방법을 다루겠다.
1. PC 워크스테이션의 설정
이 설정은 항상 켜둬야 하는 PC나 워크스테이션용 설정이다. 만일 랩탑에서 이 설정을 해두면 덮개를 덮어도 꺼지지 않기 때문에 발열이 증가할 수 있다. 다만 랩탑이지만 꺼지지 않게 해두고 계속 PC서버나 PC워크스테이션 대신 사용중이라면 이 방법을 써도 된다. 이 설정은 시스템 전체에 대해 설정하는 것이므로 root로 설정 하도록 한다.
1.1. systemd/sleep.conf 설정 확인
먼저 현재 설정을 systemd-analyze cat-config systemd/sleep.conf 명령으로 확인해본다.
$ sudo systemd-analyze cat-config systemd/sleep.conf
# /etc/systemd/sleep.conf
#  This file is part of systemd.
#
#  systemd is free software; you can redistribute it and/or modify it under the
#  terms of the GNU Lesser General Public License as published by the Free
#  Software Foundation; either version 2.1 of the License, or (at your option)
#  any later version.
#
# Entries in this file show the compile time defaults. Local configuration
# should be created by either modifying this file, or by creating "drop-ins" in
# the sleep.conf.d/ subdirectory. The latter is generally recommended.
# Defaults can be restored by simply deleting this file and all drop-ins.
#
# See systemd-sleep.conf(5) for details.

[Sleep]
#AllowSuspend=yes
#AllowHibernation=yes
#AllowSuspendThenHibernate=yes
#AllowHybridSleep=yes
#SuspendMode=
#SuspendState=mem standby freeze
#HibernateMode=platform shutdown
#HibernateState=disk
#HybridSleepMode=suspend platform shutdown
#HybridSleepState=disk
#HibernateDelaySec=
#SuspendEstimationSec=60min
위에 보면 모든 값들이 해시문자(#)로 막혀있는데, 이는 기본값을 의미한다. 그 중에 AllowSuspend=yes로 되어있는 부분이 바로 자동 절전 모드이다. 이를 no로 바꾸면 되는데, 편집을 직접하는게 아니라 overriding config를 만드는 방법을 사용하게 된다.
1.2. AllowSuspend=no 설정 방법
해당 설정은 관리자인 root 계정으로 명령해야 한다. 먼저 overriding config file을 저장할 디렉토리로 /etc/systemd/sleep.conf.d를 만들어야 한다. 그리고 해당 디렉토리에 넣을 설정 파일을 vi 같은 에디터로 만들어주면 된다. 즉 아래와 같이 명령한다.
mkdir /etc/systemd/sleep.conf.d
cd $!
vi nosuspend.conf
vi nosuspend.conf 명령어를 실행한 다음에는 아래의 내용을 넣는다. 핵심 설정 부분은 AllowSuspend=no 라는 부분이다.
[Sleep]
AllowSuspend=no
AllowHibernation=no
AllowSuspendThenHibernate=no
AllowHybridSleep=no
설정이 제대로 되었는지 확인하기 위해 systemd-analyze cat-config systemd/sleep.conf 명령을 다시 내려본다. 만일 가장 하단에 /etc/systemd/sleep.conf.d/nosuspend.conf로부터 파일을 읽혀졌다면 제대로 설정된 것이다.
root user# systemd-analyze cat-config systemd/sleep.conf
...생략...

[Sleep]
#AllowSuspend=yes
#AllowHibernation=yes
#AllowSuspendThenHibernate=yes
#AllowHybridSleep=yes
#SuspendMode=
#SuspendState=mem standby freeze
#HibernateMode=platform shutdown
#HibernateState=disk
#HybridSleepMode=suspend platform shutdown
#HybridSleepState=disk
#HibernateDelaySec=
#SuspendEstimationSec=60min

# /etc/systemd/sleep.conf.d/nosuspend.conf
[Sleep]
AllowSuspend=no
...
해당 설정은 즉시 적용되므로 따로 restart나 reload해줘야 하는 것은 없다. 다만 정 불안하다면 systemctl daemon-reload 명령을 한번 해주면 될 것이다.
2. 랩탑(노트북)용 설정
이 설정은 평소에 로그인을 했을 때는 켜두고, 로그아웃을 했다든지 덮개를 덮었을때는 절전을 허용하는 방식을 사용할 때 설정한다. 주의할 점은 이 설정은 기본적으로 로그인한 현재 일반 유저에 저장되므로 root가 아닌 일반 유저로 설정한다. 그리고 시스템에 일반 유저가 여러개가 있고 각각 다르게 로그인을 한다면 각각의 유저로 로그인해서 설정해줘야 한다. 참고로 이 설정은 "설정" 화면에서 세팅할 수도 있는데, 아래와 같이 gsettings CLI 명령어로도 가능하다.
2.1. gsettings로 설정하기
예를 들어 idle 시 화면의 밝기를 10으로 낮추고, AC연결(어댑터 연결)로 작동할 때는 절전을 끄고, battery로 작동할 때는 1500초(25분)뒤에 절전으로 들어가게 하려면 아래와 같이 설정한다.
gsettings set org.gnome.settings-daemon.plugins.power idle-brightness 10

gsettings set org.gnome.settings-daemon.plugins.power sleep-inactive-ac-type 'nothing'

gsettings set org.gnome.settings-daemon.plugins.power sleep-inactive-battery-timeout 1500
gsettings set org.gnome.settings-daemon.plugins.power sleep-inactive-battery-type 'suspend'
위에서 사용된 org.gnome.settings-daemon.plugins.power의 설정 가능한 KEY 값을 확인하는 방법은 gsettings list-recursively 명령을 사용하면 된다.
$ gsettings list-recursively org.gnome.settings-daemon.plugins.power
org.gnome.settings-daemon.plugins.power ambient-enabled true
org.gnome.settings-daemon.plugins.power idle-brightness 30
org.gnome.settings-daemon.plugins.power idle-dim true
org.gnome.settings-daemon.plugins.power power-button-action 'suspend'
org.gnome.settings-daemon.plugins.power power-saver-profile-on-low-battery true
org.gnome.settings-daemon.plugins.power sleep-inactive-ac-timeout 900
org.gnome.settings-daemon.plugins.power sleep-inactive-ac-type 'suspend'
org.gnome.settings-daemon.plugins.power sleep-inactive-battery-timeout 900
org.gnome.settings-daemon.plugins.power sleep-inactive-battery-type 'suspend'
각 설정이 궁금하면 describe를 사용하면 된다. 이렇듯 list-recursively, reset, get, set, range, describe등 다양한 명령을 알아두면 편리해진다.
| gsettings get SCHEMA KEY | 현재 KEY값 읽기 |
| gsettings set SCHEMA KEY VALUE | KEY값을 VALUE로 설정하기 |
| gsettings describe SCHEMA KEY | KEY값의 설명 |
| gsettings range SCHEMA KEY | KEY값의 설정 가능한 값 |
| gsettings reset SCHEMA KEY | KEY값을 디폴트 값으로 재설정 |
예시는 다음과 같다. 아래를 보면 describe로 sleep-inactive-battery-type 을 보고, range로 어떤 값을 설정할 수 있는지를 보여주고 있다.
# gsettings describe org.gnome.settings-daemon.plugins.power sleep-inactive-battery-type
The type of sleeping that should be performed when the computer is inactive.

$ gsettings range org.gnome.settings-daemon.plugins.power sleep-inactive-battery-type
enum
'blank'
'suspend'
'shutdown'
'hibernate'
'interactive'
'nothing'
'logout'

# gsettings describe org.gnome.settings-daemon.plugins.power sleep-inactive-battery-timeout
The amount of time in seconds the computer on battery power needs to be inactive before it goes to sleep. A value of 0 means never.
2.2. GNOME 설정 (제어판)에서 GUI로 설정하기
참고로 GNOME 설정에서 "전원"의 "자동 대기 모드"가 위 설정을 GUI로 할 수 있게 된 메뉴이다.
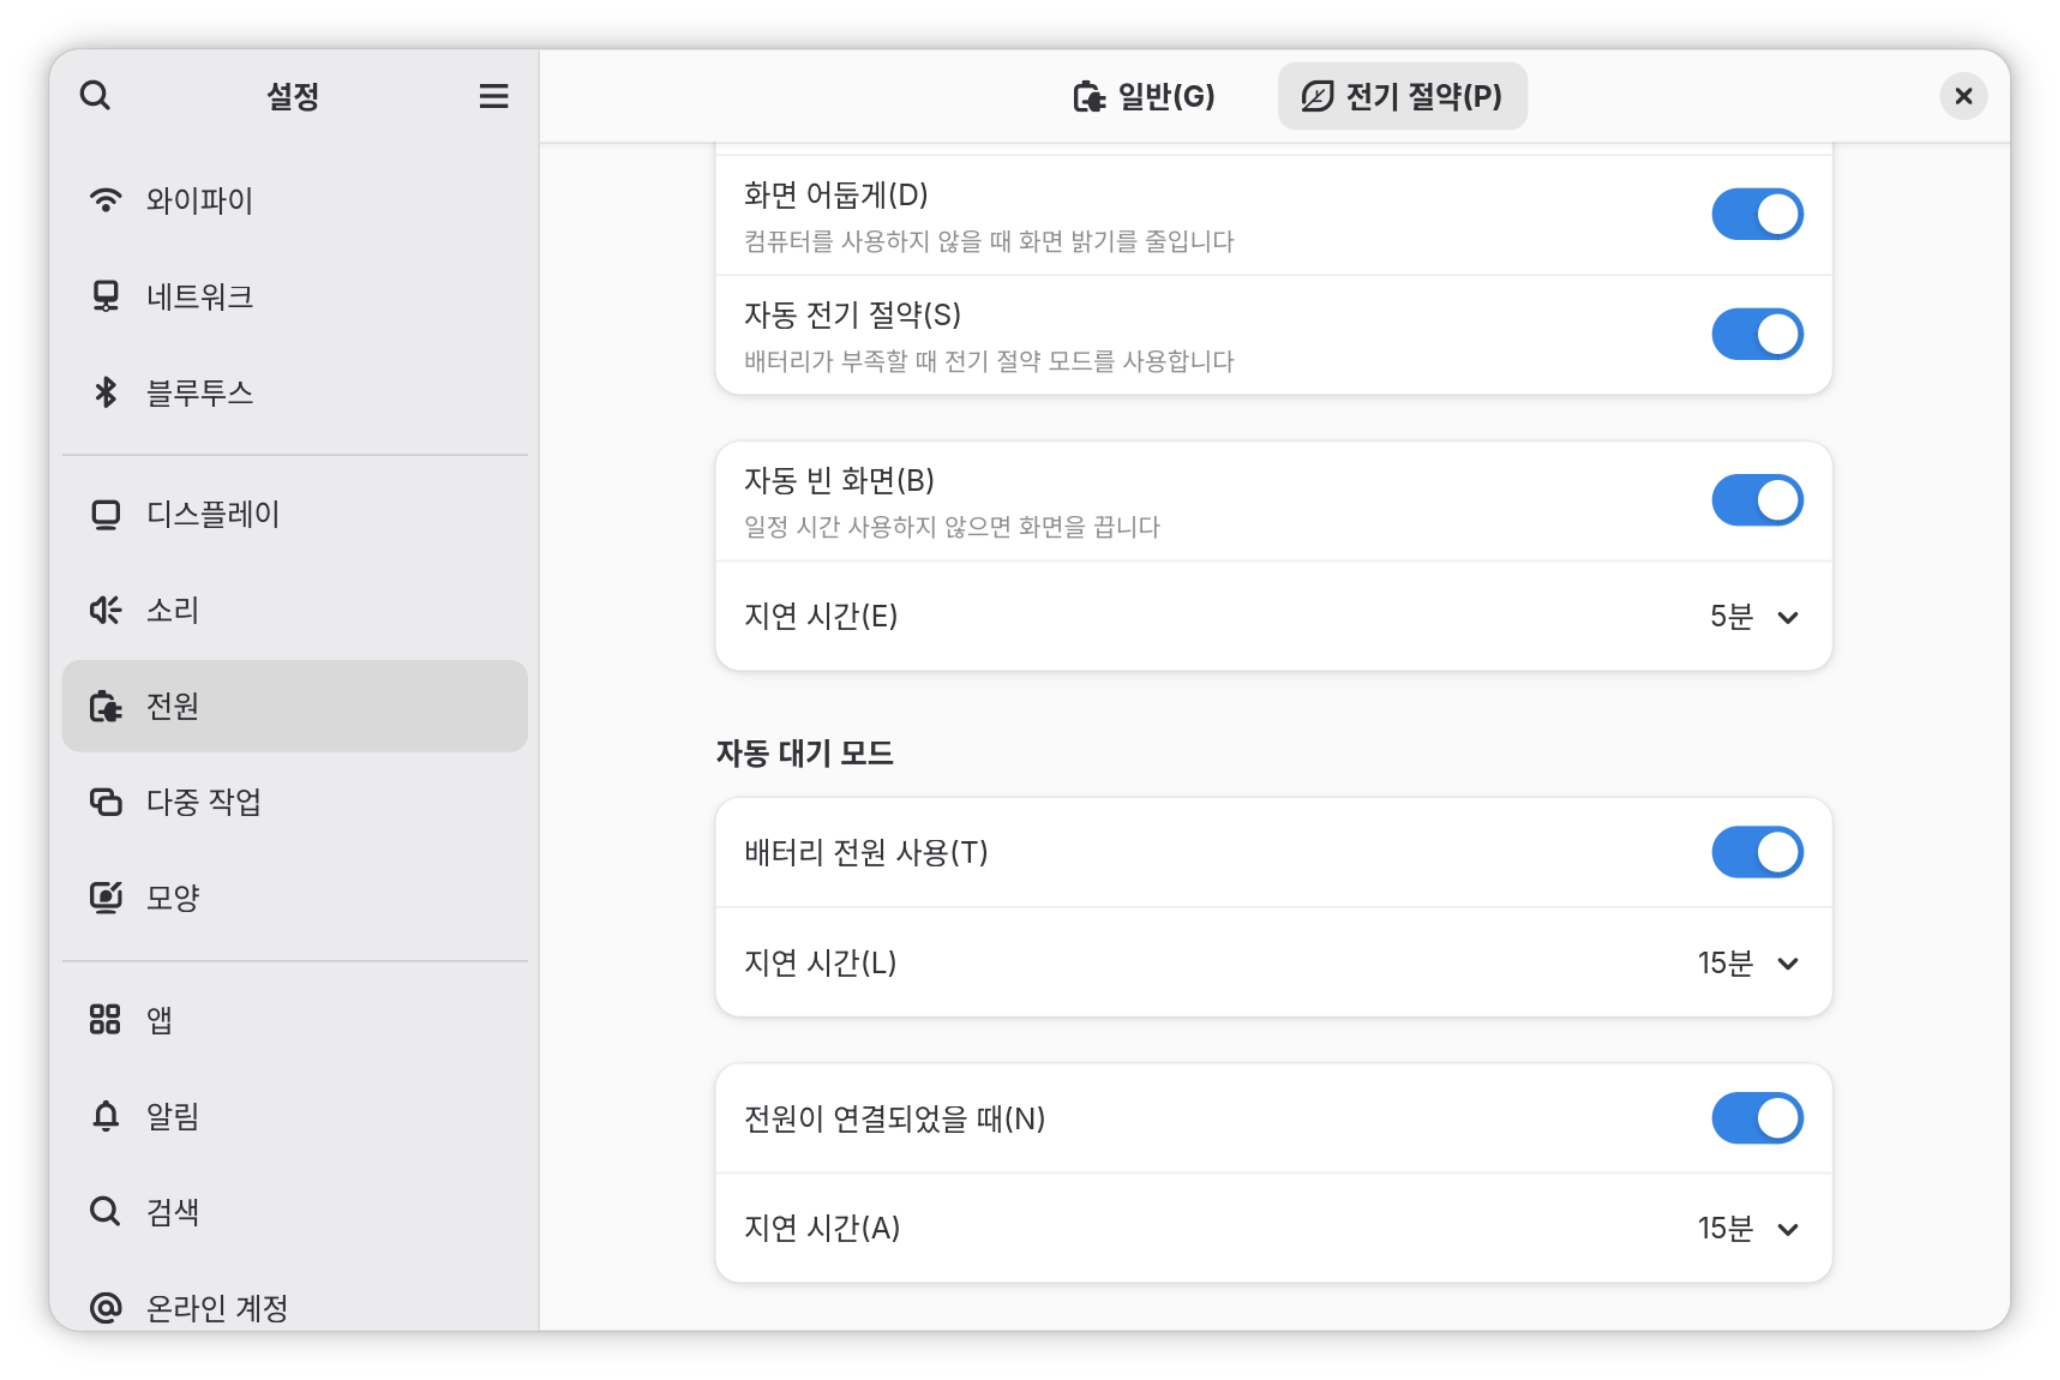
위의 "배터리 전원 사용(T)" 부분이 바로 org.gnome.settings-daemon.plugins.power sleep-inactive-battery-type 'suspend' 와 같다. 만일 org.gnome.settings-daemon.plugins.power sleep-inactive-battery-type 'nothing'으로 하면 끄는 설정이 된다. 실제로 gsettings로 설정을 바꿔보면 즉각 GNOME 설정의 GUI 화면도 변경되는 것을 볼 수 있다.
다시 말하지만 gsettings로 하는 설정은 특정 user에 귀속되는 설정이기 때문에 해당 유저로 로그인하는 경우에 의미가 있다. 따라서 여러 유저를 사용하는 경우라면 각각의 유저로 설정해야 하는데, 그게 귀찮다면 전체 유저의 값을 lock하는 방법이 있다. 이것은 바로 아래 설명한다.
2.3. 유저 기본 프로필에 절전 모드 설정하기
이 방법은 각각의 유저마다 설정을 만들어주지 않고, 모든 유저의 기본 값을 만들어주는 방법이다. 관련된 파일은 총 3개지만 첫번째 파일은 이미 존재하기 때문에 만들 필요는 없고, 2~3번째 파일만 새로 만들어주면 된다.
먼저 /etc/dconf/profile/user 파일에 아래의 2행이 있는지 확인한다. 대부분은 있을테지만 없다면 넣어준다.
user-db:user
system-db:local
/etc/dconf/db/local.d/50-power 파일을 만들고 아래의 내용을 넣어둔다. 설정은 위에서 했던 값과 동일하게 했는데, 다른 값을 쓰고 싶으면 값만 바꾸면 된다.
[org/gnome/settings-daemon/plugins/power]
idle-brightness=10
sleep-inactive-ac-type='nothing'
sleep-inactive-battery-timeout=1500
sleep-inactive-battery-type='suspend'
/etc/dconf/db/local.d/locks/power 파일을 만들고 아래의 내용을 넣어둔다.
/org/gnome/settings-daemon/plugins/power/idle-brightness
/org/gnome/settings-daemon/plugins/power/sleep-inactive-ac-type
/org/gnome/settings-daemon/plugins/power/sleep-inactive-battery-timeout
/org/gnome/settings-daemon/plugins/power/sleep-inactive-battery-type
앞서 설정을 4가지만 했기 때문에 /etc/dconf/db/local.d/50-power 파일과 /etc/dconf/db/local.d/locks/power 파일의 내용은 4줄만 들어가 있다. 만일 설정을 더 했다든지 혹은 설정을 뺐다든지 하면 이 부분을 적절하게 변경하면 된다. 설정이 완료되면 시스템에서 다시 설정 파일을 읽기 위해 root 유저로 dconf update 명령을 내린다. 일반 유저라면 sudo를 사용해서 sudo dconf update라고 명령해도 된다.
donf update
히스토리
2026-10-10 워크스테이션, 랩탑용 설정을 따로 작성 (랩탑용 gsettings 부분 추가)
2025-03-21 글 작성
'컴퓨터 관련 > 리눅스(유닉스) 일반' 카테고리의 다른 글
| Linux CopyFail 취약점 패치, CVE-2026-31431 (0) | 2026.05.12 |
|---|---|
| Upgrade to Rocky Linux 10 (로키리눅스10 업그레이드) (2) | 2025.12.15 |
| 페도라42에서 docker 오류 (1) | 2025.08.14 |
| sudoers 및 PAM 보안 설정 - sudo, su 권한 조정 (0) | 2025.01.12 |
| 페도라 리눅스 DNF 저장소 설정 튜닝하기 - Fedora 41, 44 dnf5 repository (4) | 2024.12.22 |
| 유닉스 표준 IEEE std 1003.1 issue 8 (SUSv5) 개정판 - 2024년 5월 발표 (4) | 2024.11.25 |
| 페도라 리눅스 nvidia 드라이버 설치 (RPM Fusion akmods, 2026년 10월 기준) (4) | 2024.10.19 |
| 썬더볼트 장치 스캔 방법 - Fedora Linux / Windows (2) | 2024.02.26 |


